User Interface - Getting Started with SU Animate

SU Animate V4 installs a single item in SketchUp's Plugins menu, and also provides an icon toolbar for your SketchUp viewport.
Installation: SU Animate uses an .RBZ installer, which can be installed with one click from within SketchUp. To install SU Animate, go to Window Preferences Extensions, choose Install Extension and simply navigate to the SU Animate .RBZ file on your computer.
To launch the main animation dialog, pick SU Animate from the extensions menu, or click the leftmost toolbar icon (marked above in red).
Main Animation Dialog:

The main animation dialog lists all of the animations in the current model, and provides a four button toolbar:
New: Opens a dropdown menu with options to create any of SU Animate's six animation types.
These include Keyframe, Polyline Path, Arc/Circle, Spiral Path, Table-driven, or Shadow animation.
Play: Opens the SU Animate Player dialog, and begins playing all animations.
Refresh: Refreshes the list of animations. Use when undo or redo may have affected animation data.
Tools: A submenu presents additional tools provided by SU Animate. This includes options for creating Layer animations, as well as the Make Scenes option, which is the final step before exporting your animation to .AVI or .MOV.
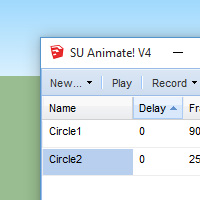
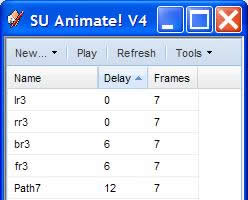
Beneath the dropdown menu, you will see a list of all animations currently in your SketchUp model.
The list of animations shows the name, the delay, number of frames, and repeat flag. Double-click to change any of these values directly in the main animation dialog. You can sort the list by any of the value columns, using the small arrow that appears to the right of the text when you mouse over the header field. By default, the list is sorted by the value of the Delay column.
Name: SU Animate generates a unique default name whenever you create a new animation. You can change it by double-clicking the name in the main animation dialog.
Delay: You can specify a number of frames to delay each animation with respect to the others. When you run all of the animations in the model, each begins after the number of frames in its Delay value. This is useful if you need to play animations in sequence, or precisely control when an animation starts relative to the others in your scene.
Frames: This field displays number of frames in each animation. For table-driven animations, this is the number of points in the file the last time it was read, and changing this value has no effect. For all other animation types, you can change the value by double-clicking the number in the dialog.
Repeat: Check the repeat box to cause the selected animation to repeat when played with an animation that has more frames.
The Icon Toolbar
SU Animate's icon toolbar provides easy access to a selection of frequently used commands (mostly relating to path animation).
- Open SU Animate main dialog - Launches the SU Animate menu, as discussed above.
- Create polyline path: - Create a polyline path by placing vertices in your scene. Double-click to save the path.
- Edit polyline path: - Edit the shape of the selected polyline path by clicking and dragging path's control vertices.
- Create Circle path: - Create a circular path. Click once to place origin, and a second time to specify the diameter.
- Edit Circle/Arc path: - Edit the diameter of the selected circle path.
- Make path from curves: Convert an existing curve or edge to an animation path.
- Edit animation path: - Edit the selected path (Change the number of frames, direction, target, camera, etc.)
- Play (all): - Play all animations. Info on playing individual animations here.
- Make Scenes: Convert frames to SketchUp scenes to prepare for .AVI or .MOV export.
Note: The Polyline and Circle paths have contextual options to allow more precise control; read more about these tools in the path animation documentation.
Creating New Animations
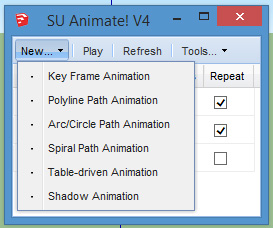
There are six possible animation types in SU Animate, which can all be created from the new menu in the main dialog (pictured right).
We have detailed documentation and tutorials for each animation type:
- Key Frame Animation
- Polyline path animation
- Circle/Arc path animation
- Sprial path animation
- Table driven animation
- Shadow animation
- See also: Layer animation | Camera animation
Playing Animations:

Once you create an animation with SU Animate V4, you can play it using the included Player. Click Play in the SU Animate V4 dialog to bring up the Player controls.
Playing an animation with the SU Animate Player simply moves the objects and/or camera as you specified when you created the animation. When you dismiss the Player dialog, it automatically undoes any changes to objects or the camera.
You can Play and Pause the animation, or Stop, which sets the animation back to its original state. You can Step frame-by frame through the animation, or click Loop to cause the Player to continuously repeat the animation.
The Player dialog also allows you to adjust playback speed, either by using the slider or clicking on the Faster and Slower buttons.
Playing All Animations:
When you select Play from the tool bar in the main animation dialog, all animations in the model are played together. You can adjust the Delay value in the main animation dialog to sequence animations. This example sequences a lot of small path animations to show the assembly of a bookcase:
Playing Individual Animations:
When you select Play by right-clicking on a named animation in the main animation dialog, the same Player dialog is displayed, but in this case only the selected animation is played. It is played at once, regardless of its Delay value. Use this feature to fine-tune a sequence of animations.
Tools Menu:
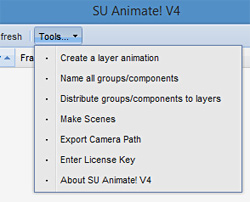
There are several tools and utilities that can be accessed from the tools menu in the SU Animate main dialog:
Create a layer animation: Animate the visibility of layers to show the passage off time. Watch a video tutorial on layer animation here.
Name all groups/components: The Name all groups/components tool assigns a unique name to each unnamed group or component instance in the model. The name is a base string plus a string to make the name unique. The base string is "Group" for a group, or the name of the component definition for a component instance. The tool does not descend into groups/components contained within other groups/components. Upon completion, the tool reports any changes in a message box.
This tool can help when you want to identify groups/components by name, for example in specifying the camera target in a camera animation, or in distributing groups/components to layers.
Distribute groups/components to layers: The Distribute groups/components to layers tool assigns named groups or component instances that are on the default layer ("Layer0") to a layer based on the name of the group/component. The layer name is the group name, or in the case of an unnamed component instance, the component definition name. The layer is created if it does not already exist. Objects with the same name, or instances of the same component definition, can end up on the same layer. The tool does not descend into groups/components contained within other groups/components. Upon completion, the tool reports any changes in a message box.
This tool is particularly helpful in creating key-frame animations in which you want to manipulate the visibility of objects by turning layers on and off. Please take a look at the key frame video tutorials.
Make Scenes - This tool creates the actual scenes in SketchUp in order to export the animation as a video file, or to render the scenes with Podium. You will be prompted to enter the number of scenes to be created. Unlike previous versions, if you have not saved the file, you will be unable to make scenes since the only way to undo the scene creation is to revert the model to the last time it was saved.