Path Animation - Part 2: Additional topics and advanced techniques
Now that you've got the basics down, here are some additional path animation techniques to help you make the most of SU Animate:
In-depth path animation topics:
Camera Target Group or Angle in Walk-thrus or fly-arounds
When creating a path based camera animation, you have three options for the camera view. The default option is the camera faces the direction of the path on the path's plane.
A second option is to assign the camera to stay focused on a particular group or component. This is done by picking the target group or component from the Target Component/Group list. Assigning a target component/group to the animation path will force the SketchUp camera to focus on that particular component or group through all the frames of the particular animation path.  If you want to have multiple targets, create more than one animation path and assign a different target per animation path.
A third new option is to fix the camera view at an angle from the animation path direction. Using this tool, you can create walk-thrus or fly-arounds that do not require a target group.
Multiple Camera Targets
A model can have more than one target. Each unique path can have its own target assigned to it. The target-per-path option allows the user to switch between targets. Since SU Animate will progress to the next path after a path has reached its end, if the next path is assigned to another target, the target is effectively switched and the camera will follow that target.
How to add/remove groups or components from paths
Add/Remove Objects from motion path - When creating object animation, SketchUp groups or components must be added to your motion path. The steps are as follows:
Create an animation path (i.e. circle, arc, spiral, polyline, etc.).
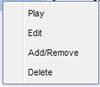
After creating an animation path, right click on the animation name from the SU Animate 4 dialog. Click Add/Remove.
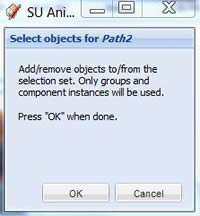
Select (click or Shift-Click) the group(s) or component(s) to be animated. The groups you select needs to be highlighted in the selection. We think this is simpler than previous version which required you to name a group/component before it could be selected. You can select the group or the groups from SketchUp's outliner as well. Again, you will need to hold down the Shift key to select more than one group or component from Outliner. To de-select (remove the group from the animation path), hold the Shift key down and then select the groups or components.
Nested group/component animation - Wheel rotates and moves forward

SU Animate has the ability to perform nested path animations. Nested animations allow you to create two motions per object such as the wheel of a car rotating as it moves forward. Other applications would include a propeller on a plane as the plane flies through the air or a drill bit spinning as it drills through a material. In the example of a tire, the tire must be a group assigned to a circle animation path. Both the circle path and tire group, are in turn grouped in a second, parent group or component. The second group or component (the tire and the path) is then assigned to the animation path the tire will travel along. Make sure that you do not put a nested group inside another component or group. If you do that the animation will not work.
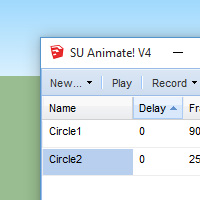
Delay and repeat
Delay: Delay is a powerful feature that allows the you to delay a specific path and any groups assigned to that path for a set number of scenes. This enables you to run several path animations in sequence. Simply type in the number of scenes the group(s) is desired to delay for and update the attributes. This feature will allow much more complex animations such as assemblies or multi-path walk thru animations.
Repeat: Repeat allows you to create an animation that has paths that repeat themselves within an animation.
Spiral Curve - Make animations that spiral
SU Animate's spiral curve option will create a animation path based on a spiral curve. This is very useful for creating a 360 degree flyover animation for a large-scale exterior scene or development.
Although this can also be done with keyframes, camera animation will typically be smoother with motion paths.
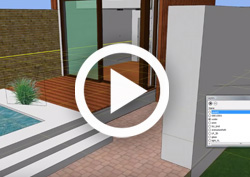
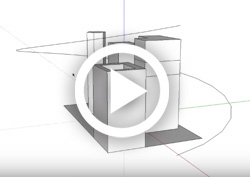
Create an Arc Path - Opening Door Demonstration
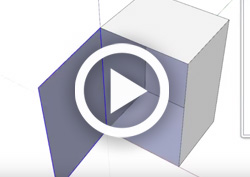
This video tutorial shows how to create a key-frame animation of a door opening and closing. Only two key frames are created, but the motion seems smooth because SU Animate interpolated additional frames.
Want to follow along? Download the SketchUp model here.
(Note: The model is in SketchUp 7 format)
Working with SU Walk
Combining SU Animate with SU Podium's Render All feature allows for walk-thru, camera photo-realistic animations. However, note that Render All V2 is still in beta. If you are a Windows user, wanting to create photorealistic walk-thrus, take a look at SU Walk.
This You tube video shows a photo-realistic walk thru animation created by Google SketchUp and SU Animate and then rendered with SU Podium's feature - Render All (SU Podium 1.7.3 or V2)