Introduction to Path Animation in SU Animate
This page is primarily about the alternative to using key frame animations. It is describes creating and using path animations. If you're just getting started, or are looking to use keyframe animation instead, see the following:
Starting your path animation:
Three introduction videos:
Creating path animation in V4 basics

Creating object animations summary

Two motions of one object in V4
1. Creating a new path:
The alternative to using key frames is to create Path animations. Path animations have an advantage in that one can create complex animations with targets and nested groups to create two motions. You can combine key frame with path animations. You can create a path by using the polyline feature from the SU Animate tool bar or by selecting connected lines, arcs or circles and then right click and select Create Animation Path. Once you create an animation path, you can assign objects (groups and components) or the camera to be animated. For walk-thru or fly-thru animations, you will select the camera to be animated. For object animations such a fork lift backing up, you will want to animate groups or components.
Check out this video to examine Create Animation Path features. Includes a quick introduction to Nested Groups for complex motions.
2. Select a Group/ Component or camera to animate
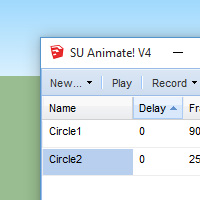
After creating a path, select an object (group/component) or camera to animate. You can do this by selecting the animation path, right clicking and from the context menu and pick Change Animation Parameters. Alternatively, select the animation name from the main SU Animate V4 dialog box once the path is created. You can animate an object (a SketchUp group or component) or the SketchUp camera. To animation on object, you must pick the Add/ Remove option from the context menu. More than one path and one group can be animated. You can assign several groups/components to the same path as well. Groups do not need a name.
3. Assign frames, camera, rotate objects along a path
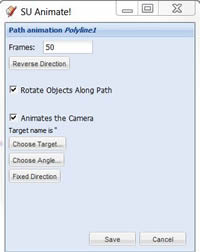
From the Path Animation user interface, select how many frames you want to assign to an animation path. Each frame will equal one SketchUp scene and every frame in the path will have the same length. You can change the number of frames for each animation at any time.
Select whether or not camera will be animated by choosing Animates the Camera. Both groups/ components and a camera can be assigned to a path.
If you are creating an object animation (groups or components), choose whether or not to Rotate Objects Along a Path. When this is on, the object (group or component) will rotate with the rotation angle of the path. In many cases, you will prefer not to rotate the object. View this video to see the difference.
4. Final Steps: Preview video, Make scenes or Record Video
When you're finished working on your animation, there are two ways you can export your work as a movie file:
Make Scenes: The first way is to convert your animation to scenes that can be exported from SketchUp as a movie file. SU Animate's power is to automatically create SketchUp scenes and layers for each frame of your animation. For object animations, the program will create a layer for each scene and hide all layers except for the one being "played". The number of scenes will equal the total number of frames in all the animation paths.
After Make Scenes is completed, it's time to play the animation using SketchUp's View Animation Play command. Make sure that the Animation settings in SketchUp are set the way you want. Usually the faster the transition speed, the better. You can then export the Animation to an AVI or a MOV file using SketchUp's File Export Animation command.
Record video from screen capture:
The newest version of SU Animate can use a screen-capture function to record and export your animation without converting every frame to a SketchUp scene. This method is only available on Windows for the time being.
5. Play the animation in SketchUp
After Make Scenes is completed, it's time to play the animation using SketchUp's View > Animation > Play command. Make sure that the Animation Settings in SketchUp is what you want. Usually the faster the transition speed, the better. You can then export the Animation to an AVI or a MOV file using SketchUp's Animation Export command.
6. Additional Path animation techniques.
All set with the basics? Jump over to Part two, where we cover additional/advanced path animation techniques.